
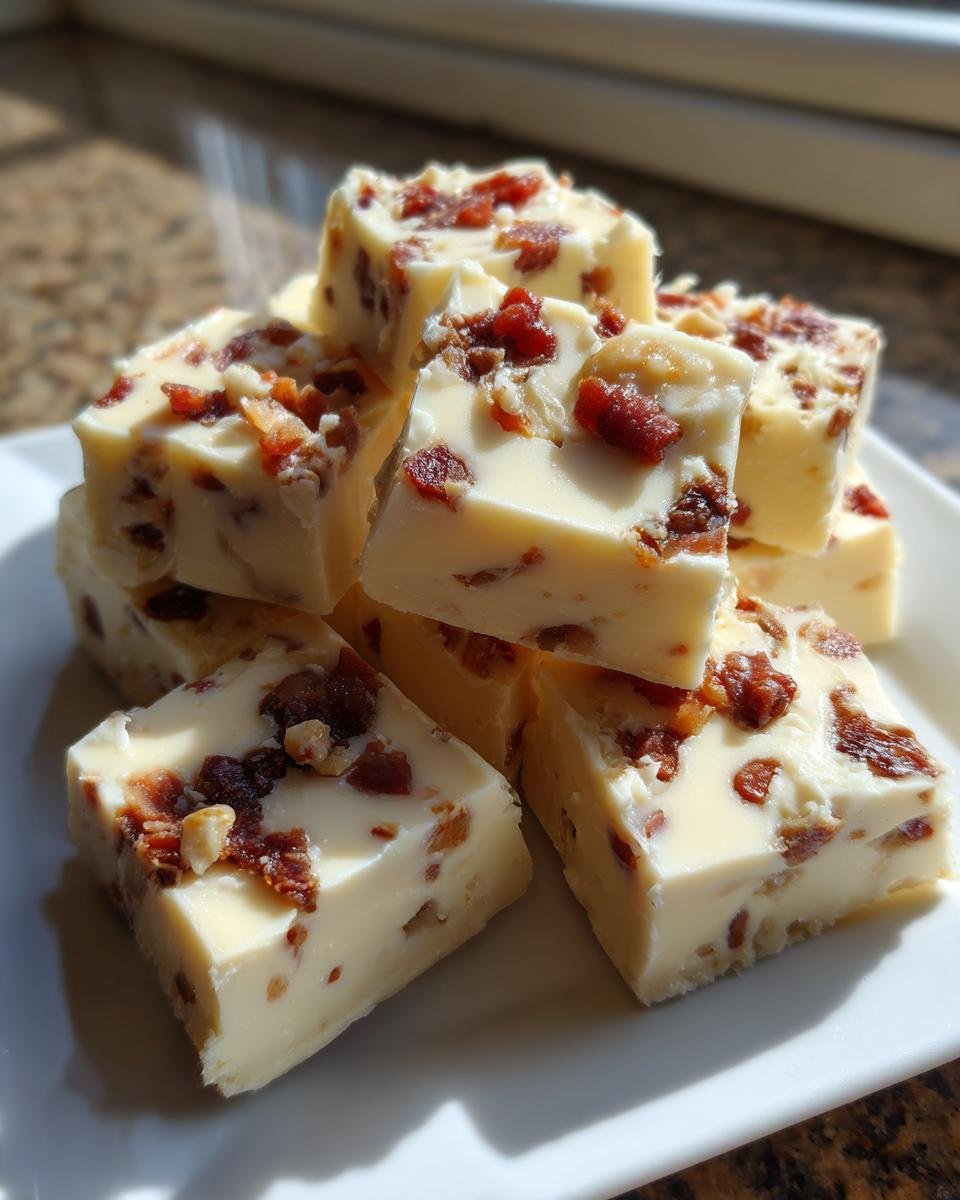
Okay, stop whatever you’re doing right now! I know what you’re thinking: Bacon in fudge? Trust me on this one. When you swirl salty, crispy bacon with rich white chocolate and the warming sweetness of real maple syrup, something totally magical happens. It’s that perfect sweet and savory hit that keeps you coming back for one more little square. Honestly, the best part about this Maple Bacon Fudge is how ridiculously easy it is. We’re talking about a no-bake miracle that comes together faster than ordering takeout. I usually have a batch of this curing in the fridge when I’m expecting company because it always gets rave reviews—kind of like the savory punch you get from my bacon, cheddar, and chive biscuits, but in candy form! It’s my secret weapon for holiday platters, and it lets me look like a candy-making genius without ever turning on the oven!
Why This Maple Bacon Fudge Recipe Stands Out
There are a million fudge recipes out there, but honestly, this one is the champion for busy cooks like us. I’ve tried the candy thermometer versions, the messy ones that require stirring for ages, and they just don’t hit the mark compared to this straightforward approach.
- It’s Absolutely No-Bake Magic: Seriously, you melt, stir, and chill. That’s it! Perfect for when you need a quick dessert contribution without turning on the stove for long.
- The Flavor Balance is Spot On: The saltiness of the bacon cuts through the intense sweetness of the white chocolate and condensed milk perfectly. It’s a flavor collision you didn’t know you needed.
- Speedy Set Time: Because we aren’t dealing with temperamental sugar syrups, this sets up beautifully in about three hours in the fridge. It’s way faster than waiting for stovetop fudge to cool down.
- It’s Great for Gifting: These rich little squares, maybe paired with some of my chocolate caramel clusters, are always travel well and look way fancier than the effort they require!
Essential Ingredients for Perfect Maple Bacon Fudge
Okay, let’s talk about what goes into this magnificent creation. Since this is a no-bake recipe, every single ingredient has to pull its weight, and boy, do they deliver! The beauty of this fudge is that it relies heavily on just a few pantry standards, plus two stars: the bacon and the maple. I always keep these items stocked because you never know when a fudge craving will hit!
Forget any complicated sugar work; we are simplifying things down to pure dairy richness and that perfect salty-sweet combination. Grab your measuring cups; here’s what you need:
- 1 (14 ounce) can sweetened condensed milk
- 1 (12 ounce) package white chocolate chips
- 1 tablespoon butter (real butter, please!)
- 1 teaspoon vanilla extract
- 1/2 cup chopped cooked bacon (and make sure it’s crispy!)
- 1/4 cup pure maple syrup (This is crucial!)
Ingredient Notes and Substitutions for Maple Bacon Fudge
When you are dealing with so few ingredients, quality jumps to the forefront, trust me. White chocolate chips melt down into the creamiest base possible for this type of fudge, so don’t try to swap them for baking bars unless you want a slightly different set. The texture just isn’t the same!
Now, the maple syrup. This isn’t the time for those pancake syrups with corn syrup filler—I’m talking 100% pure, grade A maple syrup. That natural, earthy sweetness is what balances the fat from the bacon. If you’re in a massive pinch and absolutely cannot use maple syrup, you could try using 3 tablespoons of melted, high-quality caramel (like the kind you’d use for dipping apples) mixed with a quarter teaspoon of extra vanilla instead, but honestly, you’re losing the signature flavor profile of this Maple Bacon Fudge!
Step-by-Step Instructions for Making Maple Bacon Fudge
This is the part where we turn simple ingredients into decadent candy, and let me tell you, it takes next to no actual cooking skill! Seriously, the only real challenge is keeping your hands out of the pot while it’s melting. I always make sure my bacon is done ahead of time—I mean, *extra* crispy—because soggy bacon in fudge? A total disaster. Once that’s prepped, the construction phase is fast and furious, so have your pan ready to go before you even turn on the heat!
First things first: line that 8×8 pan with parchment paper. I always leave big strips hanging over the sides, like little handles. This is your ejector seat for the finished fudge, and trust me, you’ll thank me later when it’s time to lift it out cleanly. You can see how I prep my pans for no-bake treats like my chocolate peanut butter oat bars, too!
- Line an 8×8 inch pan with parchment paper, leaving an overhang on the sides.
- In a medium saucepan over low heat, combine the sweetened condensed milk, white chocolate chips, and butter.
- Stir constantly until the chocolate and butter are fully melted and the mixture is smooth.
Listen here: If you let this mixture boil, you risk seizing the chocolate, and then you’ll have tough fudge instead of creamy fudge. Low and slow is the mantra here. Keep stirring! Once it’s perfectly smooth—shiny and liquid—yank that pan right off the burner.
- Remove the pan from the heat. Stir in the vanilla extract and maple syrup.
- Fold in the chopped cooked bacon. Make sure you mix this gently so you don’t smash up the crisp bits too much.
- Pour the mixture into the prepared pan and spread evenly. My secret tip here is to spray your spatula lightly with non-stick spray—it keeps the mixture from sticking to the tool when you’re trying to get a perfectly flat top.
- Refrigerate for at least 3 hours, or until firm.
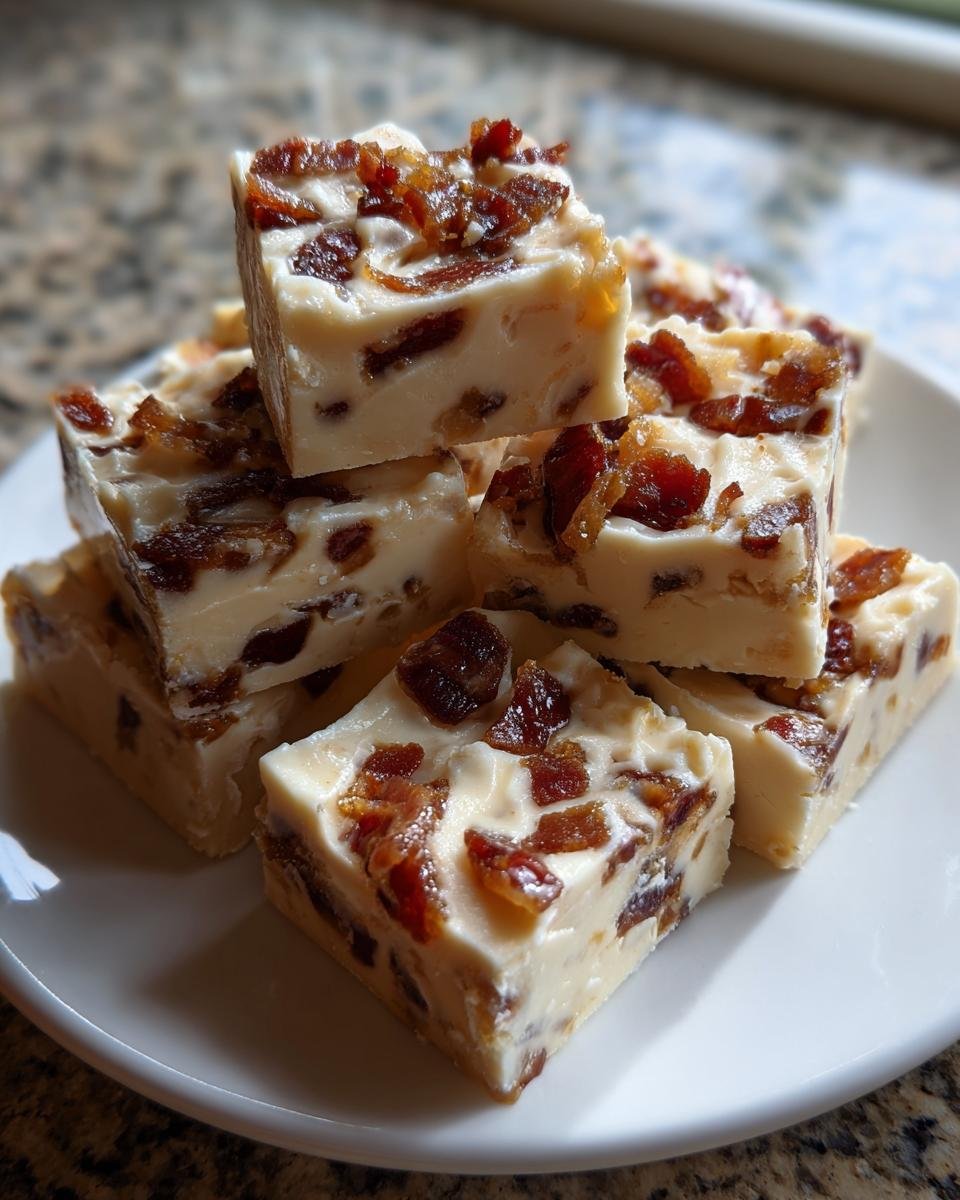
- Lift the fudge out of the pan using the parchment paper overhang. Cut into small squares before serving.

Tips for Achieving the Best Maple Bacon Fudge Texture
Texture is everything in fudge, right? It should melt on your tongue, not snap! The secret to keeping this Maple Bacon Fudge creamy and smooth lies almost entirely in controlling the heat. You must keep that saucepan on low. If it starts bubbling aggressively, pull it off the heat completely for 30 seconds to let it calm down before returning it. We only want it warm enough to melt the chips gently.
The second biggest factor is chilling time. Do not rush this! You need that full three hours, minimum, in the refrigerator for the fats to firm up properly. If you try to cut it early, you’ll wind up with a runny mess that just smears everywhere. Patience here equals perfect, sliceable squares!
Equipment Needed for Your Maple Bacon Fudge
The best part? You don’t need any fancy candy thermometer or stand mixer for this recipe. Honestly, I make this when my big mixer is already covered in dough for something else! As long as you have the basic tools for stirring and setting, you are golden. Seriously, simple gear equals delicious results!
Here’s the short list of what you’ll need to make this delicious sweet and savory dessert:
- An 8×8 inch square baking pan. Make sure it’s a sturdy one!
- A roll of parchment paper. This is non-negotiable for easy removal—I always cut mine deliberately wide so I have those handy overhang “handles.”
- A medium saucepan. Keep the heat spreader even, so avoid using the smallest pot you have.
- A sturdy spatula or wooden spoon for stirring. You need something that can handle thick chocolate mixture without bending.
That’s really all there is to it! Having these items clean and ready while your bacon crisps up ensures the final stage of melting and mixing goes off without a hitch. You can check out my tips for organizing my countertop when baking here if you want to get super organized before you start!
Storing and Serving Your Maple Bacon Fudge
Now that you’ve successfully transformed simple ingredients into this incredible Maple Bacon Fudge, the hard part—waiting for it to set—is over! We need to make sure we store this treasure correctly so the texture stays perfect and the flavor doesn’t get muted. Unlike some baked goods, this white chocolate fudge really prefers the cold environment, especially with that butter and condensed milk base.
Since this fudge contains dairy and we want that perfect snap when you bite into it, refrigeration is the way to go. Keep it sealed up tight in an airtight container in the fridge. You’ll find that it stays beautifully fresh for about a week, maybe even ten days if you manage to not eat it all in the first two days! Don’t worry about it drying out; the condensed milk protects it well.

When it comes to serving, I prefer it slightly chilled, right out of the fridge. It gives you that firm, clean bite against the salty bacon pieces. However, if you let it sit on the counter for about 15 minutes before serving, it softens just enough that the maple and chocolate flavors really bloom on your palate. It’s lovely when paired with something tart or acidic to cut through the richness—maybe a sharp apple slice, or even a small dollop of unsweetened whipped cream?
If you happen to make a massive batch (and you totally should!), you can freeze it! Just make sure you cut it into individual serving squares first, wrap those squares tight in plastic wrap, and then tuck them all into a freezer-safe bag. They freeze perfectly for up to three months, which is great for planning ahead for events like Christmas gatherings. When you want one, just transfer the frozen piece to the fridge for a few hours to thaw. They come out tasting just as fresh as the first day, almost as amazing as my chocolate caramel pecan clusters that everyone begs me to make!
Troubleshooting Common Maple Bacon Fudge Issues
Okay, I’m going to be real with you: even the best recipes can throw a curveball now and then, especially when melted chocolate is involved. But don’t panic if your beautiful Maple Bacon Fudge doesn’t look exactly like the photo straight out of the fridge. Over the years, I’ve learned exactly what causes the weird textures and how to fix them—or better yet, how to avoid them!
When you’re dealing with a simple recipe like this one, the fixes usually come down to temperature control or patience. If you follow my advice, you’ll be slicing perfectly creamy squares every time. If you run into trouble, just think back to the melting stage, because that’s usually where the hitch is. For more kitchen wisdom on mistakes we all make, you can check out my thoughts on the number one mistake!
Here are the two main glitches people sometimes run into:
My Fudge Didn’t Set—It’s Still Too Soft!
If you go to lift it out using the parchment handles and the whole thing flops—don’t worry, it’s fixable! This usually means one of two things happened. First, and most often, you didn’t let it chill long enough. You have to give it a minimum of three full hours. Resist the temptation to sneak a peek after two!
The second possibility is that you added too much liquid overall, perhaps a slightly larger can of condensed milk, or maybe you used bacon that wasn’t drained properly, introducing excess grease. If it is genuinely too soft after the full chill time, gently scrape the soft fudge back into your saucepan. Heat it on the absolute lowest setting—just enough to re-melt it—stir in one additional tablespoon of white chocolate chips, stir until smooth, and then immediately return it to the chilled, parchment-lined pan. Pop it back into the fridge for another solid four hours. That little boost of chocolate acts like an extra binder!
Why is My Fudge Grainy Instead of Smooth?
Graininess is the universal sign of overheated chocolate, which is why I stress low heat so much when melting the milk, butter, and chips. When you heat those sugars too fast, they crystallize, and that’s what gives you that sandy, gritty texture instead of that luxurious melt-in-your-mouth feeling.
If you find your fudge is grainy, sadly, there isn’t a great way to reverse active crystallization once it happens in cooled fudge. Your best bet is to try and reheat the failed batch immediately when you notice the issue. Heat it gently—again, very low—just until it’s melted, and stir in about a teaspoon of warm water or milk while whisking constantly. Sometimes that small addition of liquid helps smooth out the texture, but if the graininess is severe, you might need to start over with fresh chocolate. Fresh ingredients and even lower heat next time will solve this problem!
Variations on Classic Maple Bacon Fudge
I love that this simple Maple Bacon Fudge recipe is already such a winner, but as a home cook, I can never leave well enough alone, right? Once you’ve mastered the base version—and trust me, you will, because it’s so easy—you’ll want to start experimenting with mix-ins. You don’t need to change the core process, thankfully. It’s all about what you fold in right before it hits the pan!
I’ve played around with this recipe for friends who have different tastes, and I’ve found a few variations that keep the integrity of that sweet and savory magic while adding a new layer of texture or flavor excitement. Think of these as ways to dress up your fudge for different holidays or moods!
Here are a couple of ways I switch things up:
Adding Some Crunch with Nuts
If you want a little more texture—something hearty to chew on besides the bacon bits—nuts are your answer! I highly recommend toasted pecans. They have a slightly earthy sweetness that plays so nicely with maple syrup. If you want to incorporate them, toast about half a cup of pecan halves or pieces in a dry pan until they smell fragrant, let them cool completely, and then gently fold them in along with the bacon. It makes the fudge feel incredibly rich, almost like one of my Georgia pecan brownies, but in fudge form!
Switching Out the White Chocolate Base
While the white chocolate provides that creamy, vanilla backdrop that really lets the maple and bacon shine, sometimes you want something a little deeper. You can absolutely use semi-sweet chocolate chips instead, but approach this carefully! Semi-sweet chips have a much stronger cocoa flavor and are less sweet, so you need to compensate slightly.
If you use semi-sweet chips, I bump the pure maple syrup up to a full 1/3 cup and add just a half teaspoon of cinnamon to the mixture when you add the vanilla. It pulls the flavor profile away from pure sweet treat territory and leans more into a decadent, spicy, smoky candy. It’s fantastic for winter holidays!
A Little Kick of Spice
This is for the adventurers! If you’re making a batch just for yourself or for someone who loves a little heat in their desserts, you can add a small pinch of cayenne pepper or even a tiny dash of smoked paprika into the mixture when you add the vanilla and maple syrup. I’m talking about just a literal pinch—don’t overdo it! It doesn’t make the fudge taste spicy, but it enhances the smokiness of the bacon beautifully. It’s a subtle, lingering warmth that really elevates this Maple Bacon Fudge!
Frequently Asked Questions About Maple Bacon Fudge
I get so many questions about this recipe because, let’s be honest, it sounds a little wild until you taste it! People always ask about substitutions or how to get that perfect texture. I’ve gathered the most common things folks ask me when they are gearing up to make their first batch of this incredible sweet and savory dessert. If you have other questions, feel free to drop them in the comments below—I love helping troubleshoot!
These answers should get you right on track to your perfect candy run. Since this recipe is so simple, most issues revolve around technique, but once you know the tricks, you’ll be an old hand at it in no time!
Can I make Maple Bacon Fudge without bacon?
You absolutely can, but then you’re just making high-quality maple white chocolate fudge, which is delicious, but you lose the signature element! If you have dietary restrictions or just ran out of bacon, you can substitute the 1/2 cup of chopped bacon with an equal amount of toasted pecans or even salty, crushed pretzels. However, if you’re aiming for that perfect Maple Bacon Fudge experience, keeping the bacon is key because that salty element is what stops the fudge from becoming overly sweet.
What is the best way to cut clean squares of this white chocolate fudge?
This is my favorite tip because soft fudge can look messy if you try to cut it straight out of the fridge with a cold knife! The secret to getting those Instagram-worthy, sharp edges on your fudge is temperature and heat. First, make sure it’s fully chilled—at least three hours, please!
Next, take your sharpest, smoothest knife and run it under very hot tap water until the blade is warm. Wipe the blade completely dry, and then make your first cut. Don’t press hard; let the heat of the knife do the work. After every single slice, wipe the blade clean and reheat it under hot water, then dry it again before the next cut. It keeps the chocolate from dragging and smearing, giving you that beautiful, clean slice you want for your little squares. It takes a little extra time, but the presentation is worth it!
How long does this fudge last once made?
Because we used sweetened condensed milk, this fudge is quite stable! As long as it’s kept tightly wrapped in plastic wrap or in a good airtight container, it’ll last beautifully stored in the refrigerator for up to ten days. I mentioned freezing above, but honestly, if you are baking for a party, just make it two days ahead and keep it chilled. It’s always so much better when it’s freshly set.
Why do you use sweetened condensed milk instead of evaporated milk?
That’s a great question showing you’re thinking about the science! Evaporated milk is just cooked cow’s milk with about 60% of the water removed. Sweetened condensed milk, on the other hand, has both the water removed *and* a massive amount of sugar added. That sugar content is crucial for creating the candy structure when it heats and then cools with the chocolate. Evaporated milk won’t set up properly for this type of easy fudge; it tends to stay too soft and will just separate.
This recipe is based on using the high-sugar content of condensed milk to stabilize the melting chips. If you ever want to try making a different kind of simple dessert, like my easy macaroni salad, you learn that substituting dairy products in recipes like these is always an absolute no-go!
Nutritional Estimates for Maple Bacon Fudge
Now, I know we don’t bake this Maple Bacon Fudge for the health benefits—it’s a treat, plain and simple! But since I always get asked about what’s in these rich, decadent squares, I wanted to lay out the estimated nutrition facts for you. Remember, these numbers are based on dividing the entire recipe yield (36 squares) by the standard amount of ingredients.
Your actual figures might shift a little based on how crispy your bacon was or the exact brand of white chocolate chips you used, but this gives you a really good ballpark estimate for a single serving. If you’re looking for lighter dessert ideas overall, you might want to check out my guide on how to lose about a pound of fat, but for an indulgent sweet and savory dessert, this is amazing!
Here is the breakdown, per small square:
- Serving Size: 1 square
- Calories: 120
- Fat: 6g
- Saturated Fat: 4g
- Carbohydrates: 16g
- Sugar: 15g
- Protein: 2g
As you can see, it packs a creamy punch because of the white chocolate and condensed milk, hence the sugar content. But hey, they are small squares, and that little bit of fat and protein from the bacon helps keep the craving satisfied quickly! Enjoy responsibly!
Print
Maple Bacon Fudge
- Total Time: 15 min
- Yield: 36 small squares 1x
- Diet: Vegetarian
Description
A sweet and savory fudge recipe featuring maple syrup and crispy bacon.
Ingredients
- 1 (14 ounce) can sweetened condensed milk
- 1 (12 ounce) package white chocolate chips
- 1 tablespoon butter
- 1 teaspoon vanilla extract
- 1/2 cup chopped cooked bacon
- 1/4 cup pure maple syrup
Instructions
- Line an 8×8 inch pan with parchment paper, leaving an overhang on the sides.
- In a medium saucepan over low heat, combine the sweetened condensed milk, white chocolate chips, and butter.
- Stir constantly until the chocolate and butter are fully melted and the mixture is smooth. Do not let it boil.
- Remove the pan from the heat. Stir in the vanilla extract and maple syrup.
- Fold in the chopped cooked bacon.
- Pour the mixture into the prepared pan and spread evenly.
- Refrigerate for at least 3 hours, or until firm.
- Lift the fudge out of the pan using the parchment paper overhang. Cut into small squares before serving.
Notes
- Cook the bacon until very crisp before chopping.
- Use real maple syrup for the best flavor.
- Prep Time: 15 min
- Cook Time: 5 min
- Category: Dessert
- Method: No-Bake
- Cuisine: American
Nutrition
- Serving Size: 1 square
- Calories: 120
- Sugar: 15
- Sodium: 60
- Fat: 6
- Saturated Fat: 4
- Unsaturated Fat: 2
- Trans Fat: 0
- Carbohydrates: 16
- Fiber: 0
- Protein: 2
- Cholesterol: 15
Keywords: maple bacon fudge, white chocolate fudge, easy fudge recipe, sweet and savory dessert