
I swear, finding a decent pizza crust when you’re trying to keep things low-carb or gluten-free used to feel impossible. You’d end up with something that tasted like cardboard or dissolved the second you put toppings on it. Seriously frustrating! But folks, I’m here to tell you that pizza night is back on the menu thanks to mastering the simple Cauliflower Pizza Crust. This recipe isn’t just an alternative; it actually tastes great and holds up really well, provided you nail one absolutely crucial step.
I spent weeks battling soggy centers before I finally figured out the secret handshake for getting all that extra water out of the cauliflower. Once you get that part right—and trust me, it’s easy once you know the trick—you’ll get that satisfying, slightly crispy base you’ve been dreaming about. It’s the best way to satisfy those pizza cravings without all the guilt!

Why This Cauliflower Pizza Crust Recipe Works (Experience & Expertise)
Look, cauliflower pizza crusts get a bad rap sometimes, and it’s usually because people skip the crucial setup. This recipe works because we treat the cauliflower rice like it’s just wet flour that needs serious convincing to dry out! The magic here isn’t in fancy spice blends; it’s about structure, and structure comes from removing as much water as humanly possible before it ever hits the oven.
When you get the moisture right, the mozzarella and Parmesan we use act like perfect little binders, creating a cohesive, firm base that won’t flop when you pick it up. It truly feels like you’re holding real pizza dough, I promise!
The Secret to a Non-Soggy Cauliflower Pizza Crust
If you try to skimp on this step, you’re just going to end up with warm, cheesy soup on a pan. No exceptions! You have to take your two cups of riced cauliflower—after you’ve cooked it or steamed it and let it cool a bit—and you absolutely *must* squeeze it dry. I grab the cleanest, thinnest kitchen towel I own, pile the cauliflower in the middle, and then squeeze for dear life over the sink.
Seriously, wring it out until you feel less liquid coming out than air! This non-negotiable step ensures your Cauliflower Pizza Crust bakes up golden and crisp instead of steaming itself into mush.
Gathering Ingredients for Your Cauliflower Pizza Crust
Okay, let’s talk exactly what you need for this base. Since we’re counting on these simple ingredients to hold everything together, precision matters here! Don’t worry about keeping produce fresh for too long; check out my tips on keeping your greens greener, but for the cauliflower, you want it ready to rice right away.
You’ll need:
- 2 cups riced cauliflower, squeezed super dry—I mean bone dry!
- 1 large egg, which you should whisk lightly before adding in.
- 1/2 cup shredded mozzarella cheese—the low-moisture kind works best.
- 1/4 cup grated Parmesan cheese, for that salty kick.
- 1/2 teaspoon dried oregano for classic Italian flavor.
- 1/4 teaspoon salt and just a tiny pinch (1/8 teaspoon) of black pepper.
That’s it! See? Nothing crazy, just good flavor builders holding that cauliflower together.
Step-by-Step Instructions for the Perfect Cauliflower Pizza Crust
Alright, now that your cauliflower is dry enough to power a small car, we can assemble this thing! Before we even think about mixing, get that oven warmed up to 400 degrees Fahrenheit. This recipe bakes hotter and faster than regular dough, so you need the heat ready to go. While it’s heating, line a standard baking sheet with parchment paper. I skip spraying the paper itself; the cheese seems to handle the non-stick duty perfectly fine.
If you want some fun crunchy snacking instead of a full pizza, you can actually use this same base mixture to make quick little pizza chips! But for the crust, pay close attention to how you spread it out. We’re aiming for stability here.
Preparing and Shaping the Cauliflower Pizza Crust
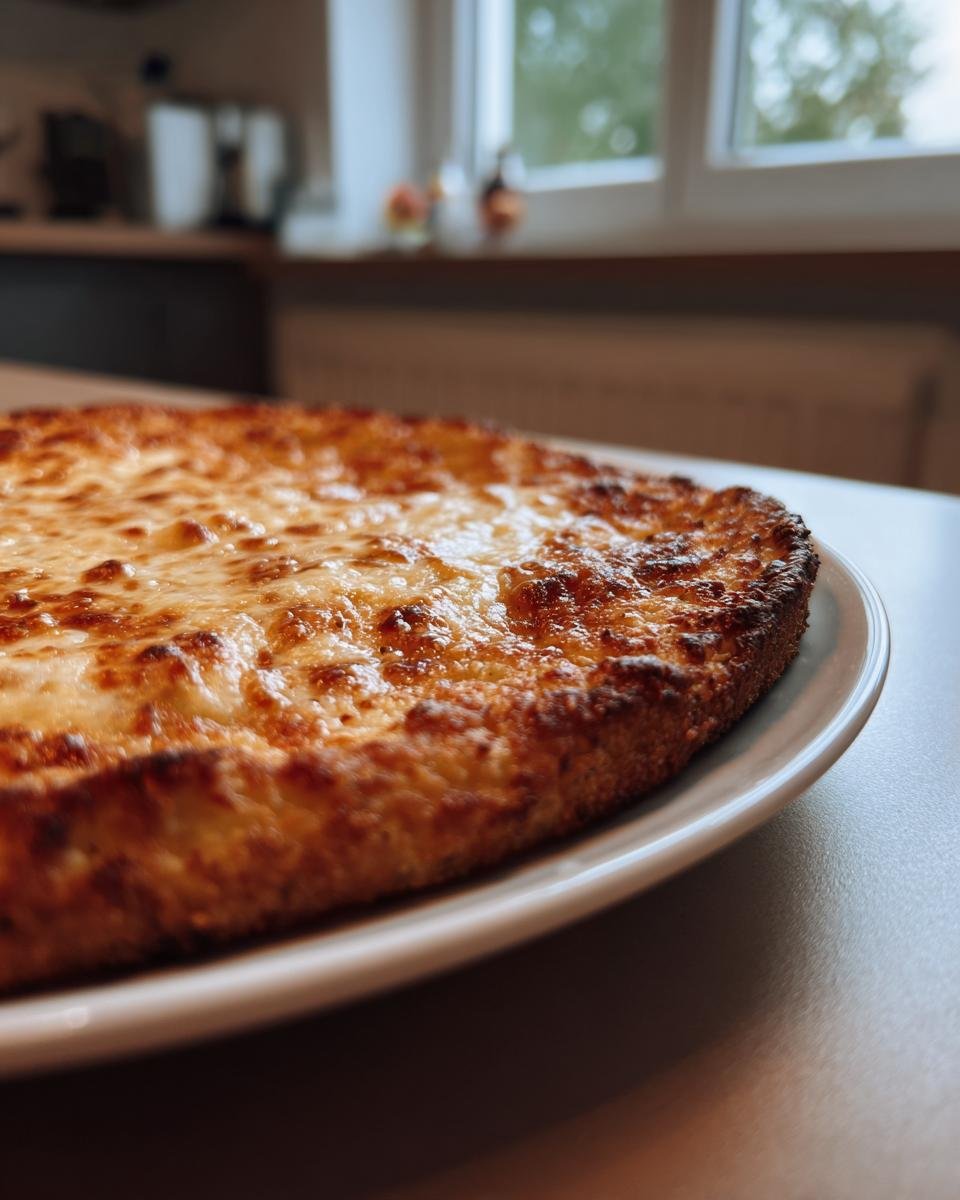
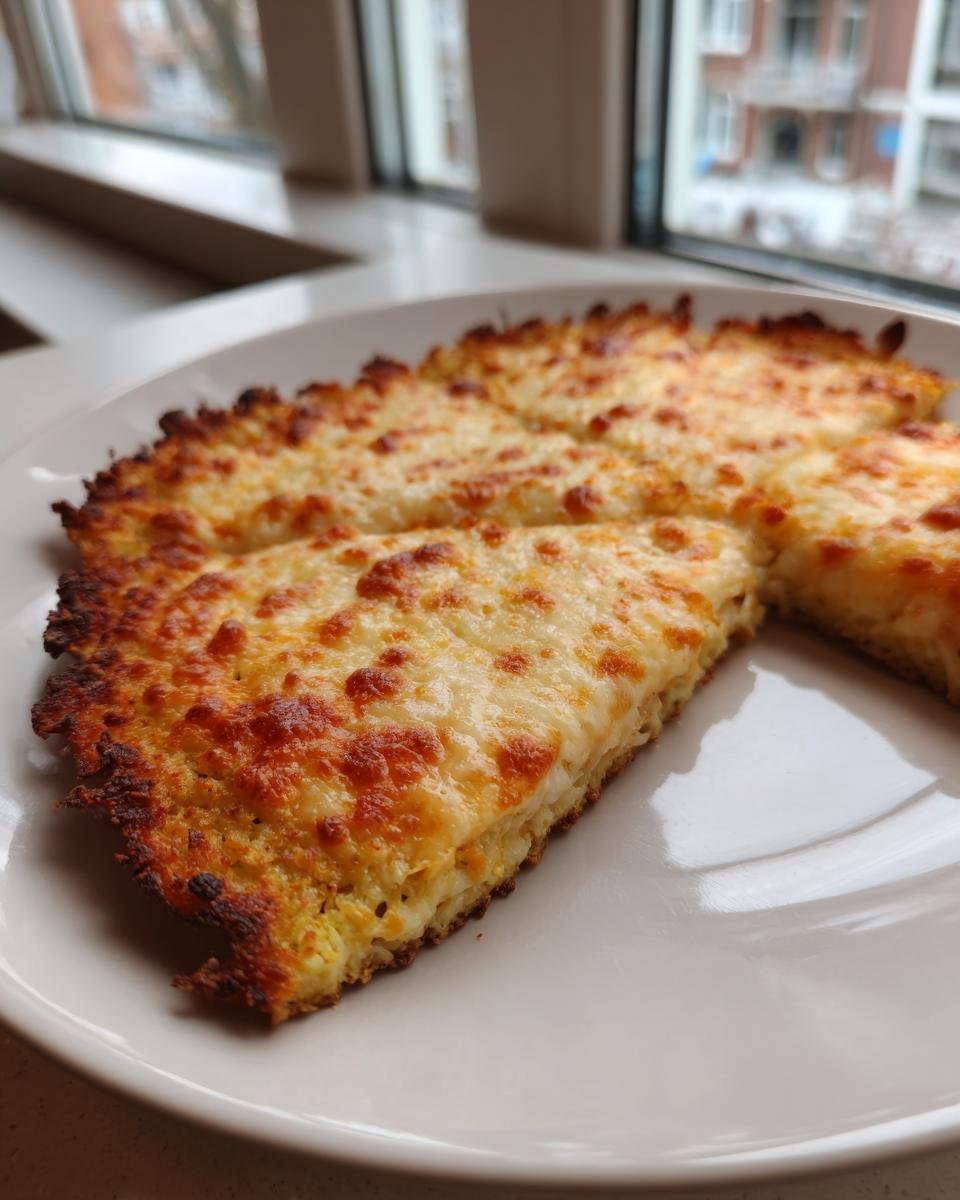
In a medium bowl, toss that dried riced cauliflower with your wet ingredient—that lightly beaten egg—and then dump in both cheeses, the oregano, salt, and pepper. Mix it all together until it looks like something you can actually grab. Now, take that sticky mass and plop it right onto your parchment-lined sheet. You need to press it down firmly into a uniform, 10-inch circle. Make sure you get it about 1/4 inch thick all the way around. Don’t leave any thin spots near the edge or thick lumps in the middle, or it won’t cook evenly!
Baking Time for the Cauliflower Pizza Crust Base
Once it’s shaped, slide that base into your preheated 400°F oven. This first bake is purely about dehydration and structure setting. We bake it for 20 to 25 minutes. You’ll know it’s ready when you see the edges starting to turn honest-to-goodness golden brown, and when you poke it gently, it feels nice and firm. If it still seems squishy, give it another five minutes. We need this base sturdy before we add anything wet!
Topping and Final Bake for Your Cauliflower Pizza Crust
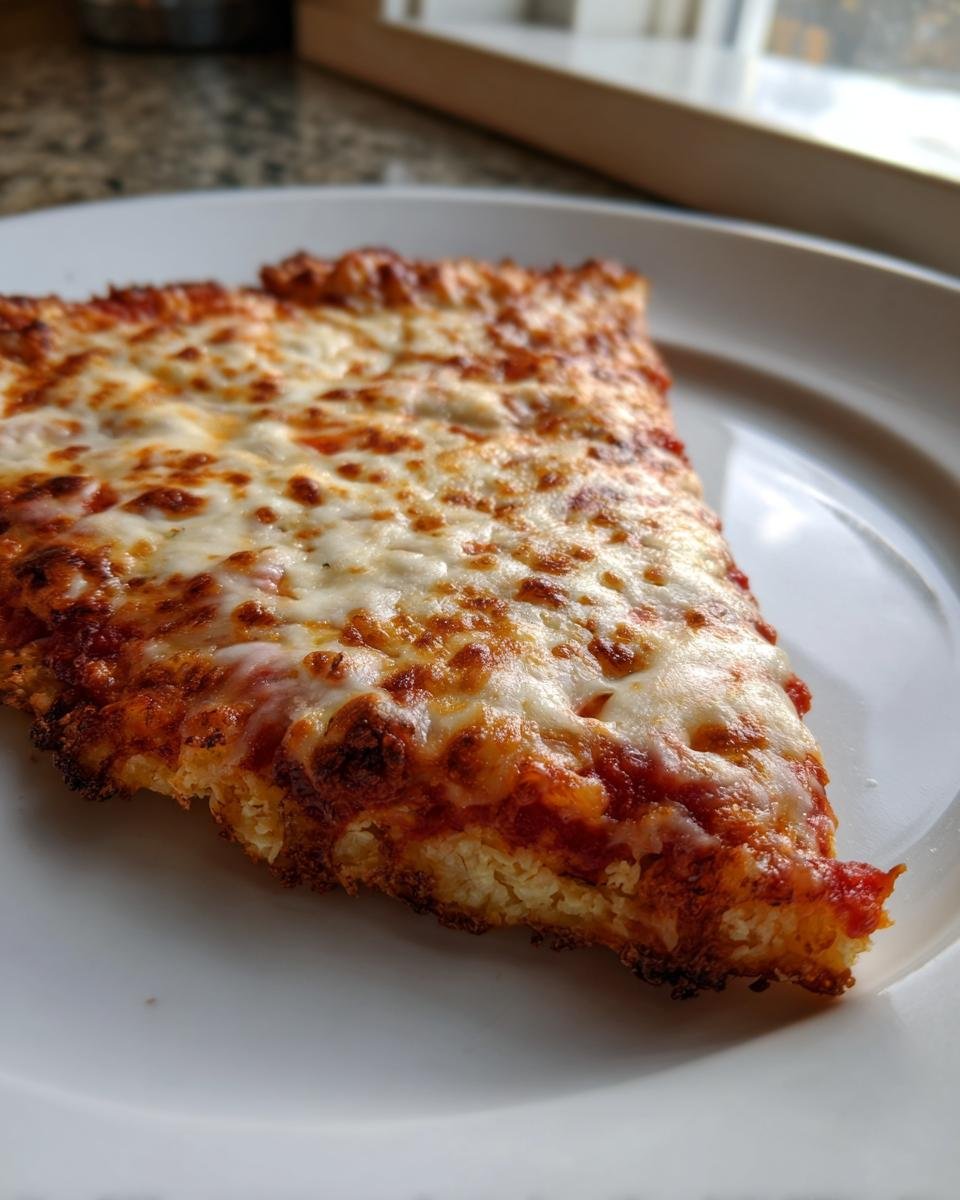
Okay, the heavy lifting is done! You have a firm, golden Cauliflower Pizza Crust base sitting on the counter. This is where you have to use a little restraint, trust me on this. Because this crust is so wonderfully low in carbs, it can’t handle what a heavy wheat crust can. Do not overload it with watery tomato sauce or heaps of raw, juicy vegetables. Keep your toppings light and flavorful. If you’re looking for inspiration, I love a simple white pizza version, sort of like this garlic herb style.
Once you’ve added your sauce, cheese, and whatever else you’re feeling, slide it right back into that 400°F oven. The second bake is quick—just 5 to 10 minutes more. You’re just looking for that mozzarella to get perfectly melted and bubbly. Take it out when it looks gorgeous, and get ready for pizza!
Ingredient Notes and Substitutions for Cauliflower Pizza Crust
I want to be super clear about the binding agents here because that’s where most people mess up their Cauliflower Pizza Crust. The egg and the cheese aren’t just for flavor; they’re the glue holding everything together after we squeeze out all that water. If you skip one, you’re going to end up with a crumble, not a crust!
Now, I know sometimes we can’t use standard dairy. If you need a dairy-free option, you can swap the mozzarella and Parmesan cheeses for about 3/4 cup of a good quality nutritional yeast blend mixed with a dairy-free mozzarella alternative. You might need to add just a splash more egg or an extra spoonful of almond flour to grab onto that moisture, but try to keep the liquid content exactly the same.
If you had an egg allergy instead, flax “egg” usually works in savory baking like this, but you need two tablespoons of ground flaxseed mixed with about five tablespoons of water and let it sit for five minutes to thicken up before adding it to the mix.
Tips for Success When Making Cauliflower Pizza Crust
I’ve got a few veteran tips now that I’ve made this Cauliflower Pizza Crust almost every week for the last two years—and yes, I still occasionally wreck one when I get lazy! The absolute number one rule, which I can’t repeat enough, is the moisture removal. If the cauliflower feels damp when you mix the cheese in, stop, squeeze it again! You want it to have the consistency of damp sand, not wet beach sand.
Here’s another thing I learned the hard way: let the baked crust cool down for at least five minutes on the pan before you even *think* about moving it or topping it. If you try to slide that hot, newly-set crust onto a cutting board immediately, the center will likely tear right out. Give it a few passive minutes to firm up a bit, then gently slide it onto a cooling rack or even just move the parchment paper aside. This cooling time is a huge act of trust in the process!
Also, if you look at my guide on common baking pitfalls, a big issue in crusts like this is overcrowding. Be judicious with your toppings. A light layer of fresh basil, a thin spread of sauce, and moderate cheese load guarantees you a successful, crisp experience.
Serving Suggestions for Your Cauliflower Pizza Crust
Since we worked so hard to keep this Cauliflower Pizza Crust crisp, we don’t want heavy, sloppy toppings to instantly undo our efforts! I stick to lighter sauces here—maybe a drizzle of pesto or just some olive oil mixed with garlic instead of a thick, wet marinara. Think fresh, bright flavors that sing alongside the veggie base.
My personal favorite is piling on arugula after it comes out of the oven, maybe with some shaved Parmesan and a light drizzle of balsamic glaze. It’s so fresh! To make it a full meal, you absolutely need a great side salad—you can’t go wrong with the simple yet zesty dressing in my recipe for a copycat Olive Garden Salad. It keeps the whole meal feeling light!
Storage and Reheating Instructions for Leftover Cauliflower Pizza Crust
If, by some miracle, you have leftovers of this amazing Cauliflower Pizza Crust, don’t even think about the microwave! The microwave is the enemy of crispness for any vegetable-based crust, trust me. The absolute best way to save it is to cool it completely *after* the first bake, but *before* you add any toppings.
Wrap the bare crust tightly in plastic wrap, then pop it in the fridge for up to three days. To reheat and crisp it up, use a toaster oven or just bake it directly on the rack at 350 degrees for about 8 minutes. It’ll be almost as good as fresh!
Frequently Asked Questions About Cauliflower Pizza Crust
I always get emails when people try making veggie crusts for the first time, and honestly, most questions boil down to moisture control! This is a totally different beast than regular flour-based dough, so I’m happy to clear things up here. We want this to be a reliable, delicious low carb crust every time you make it.
If you’re loving the idea of homemade, I even have a great recipe for cottage cheese flatbread that’s another fantastic flour alternative if you ever want to mix things up!
Can I skip squeezing the water out of the cauliflower?
Oh, please don’t! If you skip squeezing the water out, you are going to end up with a soggy, sad mess that resembles steamed vegetables more than actual pizza. Remember, the egg and cheese are only strong enough to hold the dried cauliflower fibers together. Any extra water ruins that structure immediately, and suddenly, your gluten free pizza crust is just falling apart. It’s the most important step, hands down!
How do I make this Cauliflower Pizza Crust dairy-free?
That’s a great question for anyone with sensitivities! Since the cheese acts as a major binder, you can’t just leave it out. For a dairy-free Cauliflower Pizza Crust, you need to replace the mozzarella and Parmesan. I suggest using about 3/4 cup of nutritional yeast combined with a good, firm vegan mozzarella substitute that melts well. You might need to add just a tiny splash of olive oil or perhaps a bit more egg to make sure everything sticks together properly, since the vegan cheeses don’t always bind identically to dairy cheese.
Estimated Nutritional Data for Cauliflower Pizza Crust
Now, before you dive in, I want to share the numbers because this is a low-carb recipe, after all! Remember that the nutrition label breakdown really depends on how thick you make your crust and what you put on top. These figures are just an estimate for the crust base itself, broken down into 8 slices.
I pulled these numbers after dividing the base ingredients into 8 servings. If you load up on high-fat meats or heavy sauces, your final slice will look different, of course! But for just the crust, you’re looking at something surprisingly light. It’s amazing what you can make when you swap out the heavy flour for veggies!
Here’s the scoop for one slice (out of 8):
- Calories: About 85 per slice
- Fat: Only 5 grams
- Protein: A solid 7 grams! Not bad for a veggie crust.
- Carbohydrates: Just 5 grams, with 2 grams coming from fiber.
- Sugar: We kept that super low at only 1 gram.
- Sodium: Around 180 mg.
It’s a fantastic way to enjoy pizza night while keeping things sensible. Seeing those numbers always makes me feel better about eating a second slice!
Share Your Cauliflower Pizza Crust Creations
I really hope you love this Cauliflower Pizza Crust as much as my family does! Now that you’ve successfully fought the battle against soggy cauliflower, I absolutely need to see what you created. Pizza is so personal, and I’m dying to know your favorite topping combinations. Did you keep it classic pepperoni, or did you try something bold?
Please take a second to leave a star rating right underneath this section—it helps other folks know that this recipe is worth their time! And if you snap a picture of that golden, firm base, tag me on social media! I love browsing through everyone’s successful dinners.
If you have any last-minute genius topping ideas or maybe a new trick you discovered during the pressing stage, drop it in the comments below. I’m always looking to learn more, even after all these years of making this recipe. If you need to reach out directly with a question, you can always use my contact page, but comments are the best place for community tips!
Print
Simple Cauliflower Pizza Crust
- Total Time: 45 min
- Yield: 1 medium pizza 1x
- Diet: Low Fat
Description
A basic recipe for making a low-carb pizza crust using cauliflower.
Ingredients
- 2 cups riced cauliflower, squeezed dry
- 1 large egg, lightly beaten
- 1/2 cup shredded mozzarella cheese
- 1/4 cup grated Parmesan cheese
- 1/2 teaspoon dried oregano
- 1/4 teaspoon salt
- 1/8 teaspoon black pepper
Instructions
- Preheat your oven to 400 degrees Fahrenheit (200 degrees Celsius). Line a baking sheet with parchment paper.
- Place the dried riced cauliflower in a medium bowl.
- Add the beaten egg, mozzarella cheese, Parmesan cheese, oregano, salt, and pepper to the cauliflower. Mix until well combined.
- Transfer the mixture to the prepared baking sheet. Press the mixture firmly into a 10-inch circle, about 1/4 inch thick.
- Bake the crust for 20 to 25 minutes, or until the edges are golden brown and the crust is firm.
- Remove the crust from the oven and add your desired toppings.
- Return the pizza to the oven and bake for an additional 5 to 10 minutes, until the cheese is melted and bubbly.
Notes
- Squeezing the moisture out of the riced cauliflower is the most important step for a crisp crust. Use a clean kitchen towel or cheesecloth.
- Do not overload the crust with wet toppings to prevent sogginess.
- Prep Time: 15 min
- Cook Time: 30 min
- Category: Dinner
- Method: Baking
- Cuisine: American
Nutrition
- Serving Size: 1 slice (of 8)
- Calories: 85
- Sugar: 1
- Sodium: 180
- Fat: 5
- Saturated Fat: 3
- Unsaturated Fat: 2
- Trans Fat: 0
- Carbohydrates: 5
- Fiber: 2
- Protein: 7
- Cholesterol: 30
Keywords: cauliflower pizza crust, low carb crust, gluten free pizza, vegetable crust