
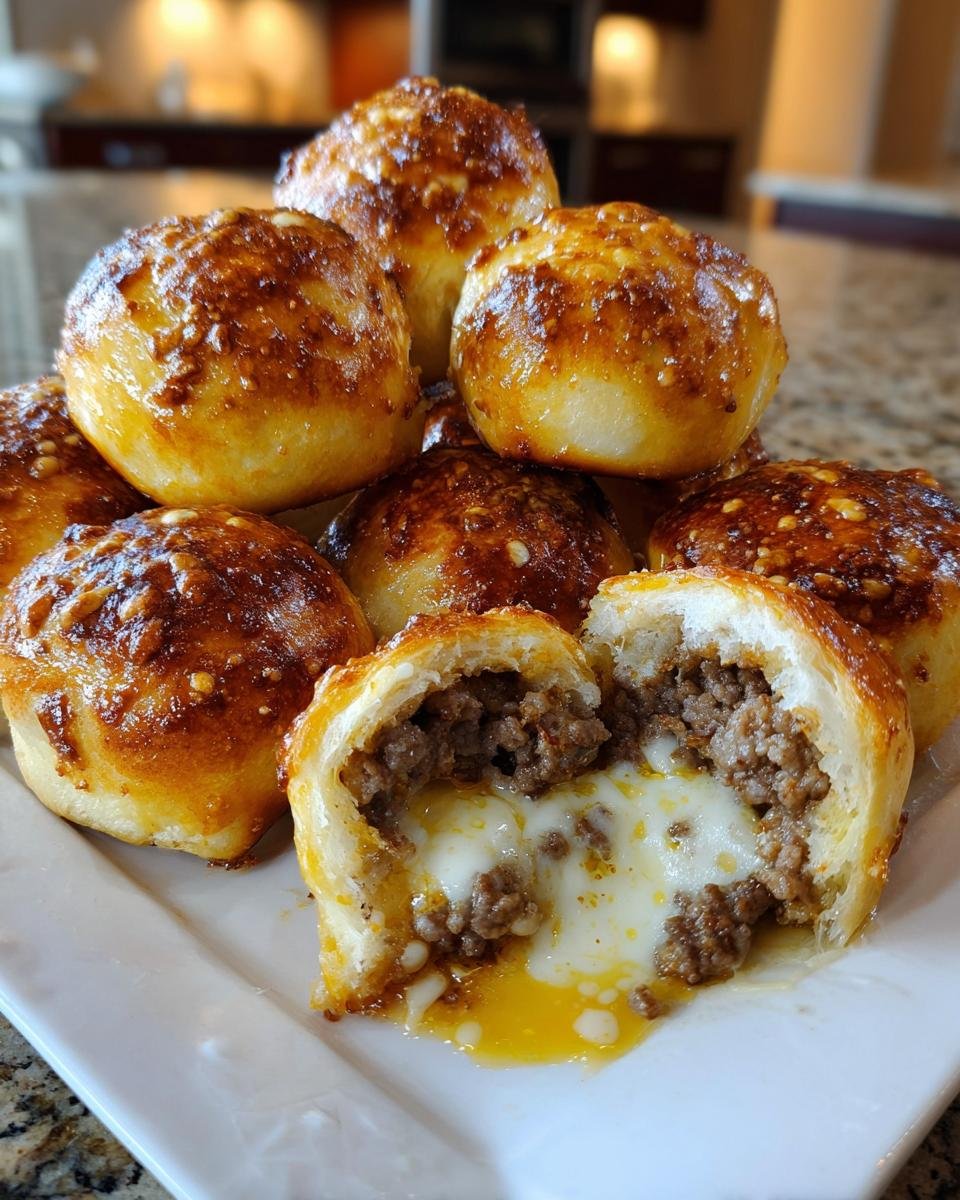
Listen, sometimes you just need comfort food that’s ridiculously easy but tastes like you spent hours making it, right? Well, stop what you’re doing because I’ve hit the jackpot! These Garlic Parmesan Cheeseburger Bombs are everything you dream of when you want a burger but don’t want the fuss—they’re baked, they’re bite-sized, and they drip with cheese. I’m telling you, the first time I made these for a big Sunday football gathering, they vanished before halftime. Seriously, people couldn’t believe they were made from simple refrigerated biscuit dough! They are the ultimate cheesy, savory snack that brings everyone running to the kitchen. You’re going to absolutely adore how fast these come together. If you want to know more about the folks behind sharing these great recipes, I love what the good people at Tastiqa are doing!
Why You Will Love These Garlic Parmesan Cheeseburger Bombs
I could rave about these little gems all day, but let’s get straight to why you need to put these on your baking sheet ASAP. They hit every single sweet spot for easy weeknight dinners or killer party snacks. When you make something this good using basically pantry staples, you know you’ve found a keeper!
- They Skip the Fryer: Honestly, who needs the mess and the extra oil? We’re baking these babies, which means they come out golden brown and steamy hot, but you skip straight to the good stuff without a splatter guard in sight. It’s pure convenience baked right in!
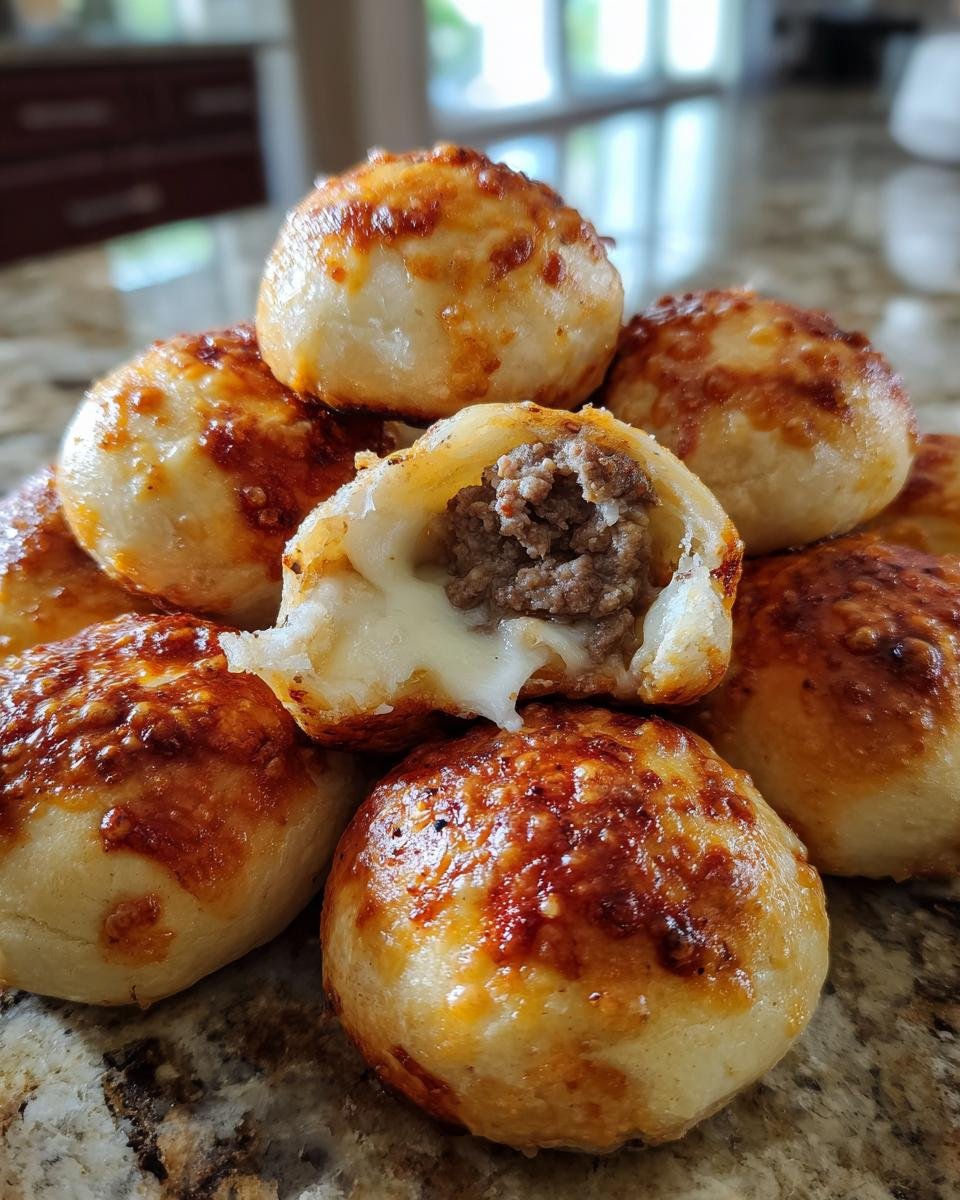
- Unbelievable Flavor Combo: We’re taking that perfect, juicy cheeseburger flavor—seasoned beef and melted mozzarella—and smashing it together with the amazing zing of fresh garlic and sharp Parmesan cheese. It’s burger night, but portable and way more delicious, if you ask me.
- Grab-and-Go Goodness: These are the definition of bite-sized heaven. They’re perfect for game day, lunchboxes, or just sneaking one while you’re cleaning up dinner. You don’t need plates or forks; just grab it and enjoy. For more unbelievably easy meals like this, check out some of my favorites over at Tastiqa!
- Lightning Fast Assembly: Seriously, you mix the filling, wrap the dough, brush the topping, and they’re in the oven. From the moment you pull out the biscuit dough to when they come out golden, it all happens so fast you’ll wonder where the flavor came from!

Essential Ingredients for Perfect Garlic Parmesan Cheeseburger Bombs
Okay, this is where the magic starts, but honestly, it’s just simple stuff you probably have right now. The key is using quality ingredients because they shine right through the biscuit dough. We need the beef for the body, the cheese for the ooey-gooey center, and that garlic Parmesan topping to make it completely irresistible. If you’re looking for more recipe inspiration, I always check out what’s cooking over at Tastiqa!
For the Filling and Dough
For the actual heart of the bomb—the cheesy meatball inside the dough—you’ll need the core components. When you grab your ground beef, try to get at least 85/15; fat equals flavor, and we don’t want these things tasting dry at all! We mix that with some breadcrumbs and milk to keep everything tender, an egg to bind it up, and then the cheese!
- 1 pound ground beef (the fattier the better for flavor!)
- 1/2 cup breadcrumbs
- 1/4 cup milk
- 1 egg
- 1 teaspoon salt and 1/2 teaspoon black pepper
- 1 cup shredded mozzarella cheese (you need that melt factor!)
- 1/2 cup grated Parmesan cheese (this goes directly into the beef)
- 2 cloves garlic, minced very fine
- 1 package (8 count) refrigerated biscuit dough (the shortcut hero!)
For the Garlic Parmesan Topping
Don’t skip brushing these tops! This is what gives the outside that incredible, savory, slightly crunchy shell. It turns a regular biscuit into a bomb, trust me. It gets all toasty in the oven and smells divine while baking.
- 2 tablespoons melted butter
- 1/4 cup remaining Parmesan cheese (save this for the top!)
- 1 teaspoon garlic powder
Step-by-Step Guide to Making Garlic Parmesan Cheeseburger Bombs
Okay, getting these ready is super quick, especially since we’re using pre-made dough! You’ve got about 15 minutes of prep time, and then they bubble away in the oven for about 18 minutes total. It’s such a fast payoff for minimal effort. If you want even more amazing short-cut recipes, you should definitely check out Tastiqa!
Mixing the Cheeseburger Filling
First things first, preheat your oven to 375 degrees F and line a baking sheet with parchment paper. Now, take your ground beef, breadcrumbs, milk, egg, salt, and pepper. Mix them up gently! I mean it—if you overmix the meat, you end up with dense, tight little hockey pucks instead of tender bombs. Don’t incorporate too much air! Once it’s just combined, gently fold in your mozzarella, the first half of your Parmesan cheese, and that fresh minced garlic. That’s the gooey heart right there.
Assembling and Sealing the Garlic Parmesan Cheeseburger Bombs
Next, grab those refrigerated biscuits. Flatten each one a bit—don’t smash them paper-thin, just flatten them enough to hold the filling. Spoon about two tablespoons of that beef mixture right in the center. This is the critical moment: wrap that dough around the meat mixture like you’re wrapping a tight little present. You absolutely MUST pinch those edges together completely and roll it smooth to seal it. Trust me, if you leave a crack, the mozzarella will escape and make a giant cheesy mess on your pan. Place the sealed balls seam-side down on your baking sheet.
Baking and Finishing Touches
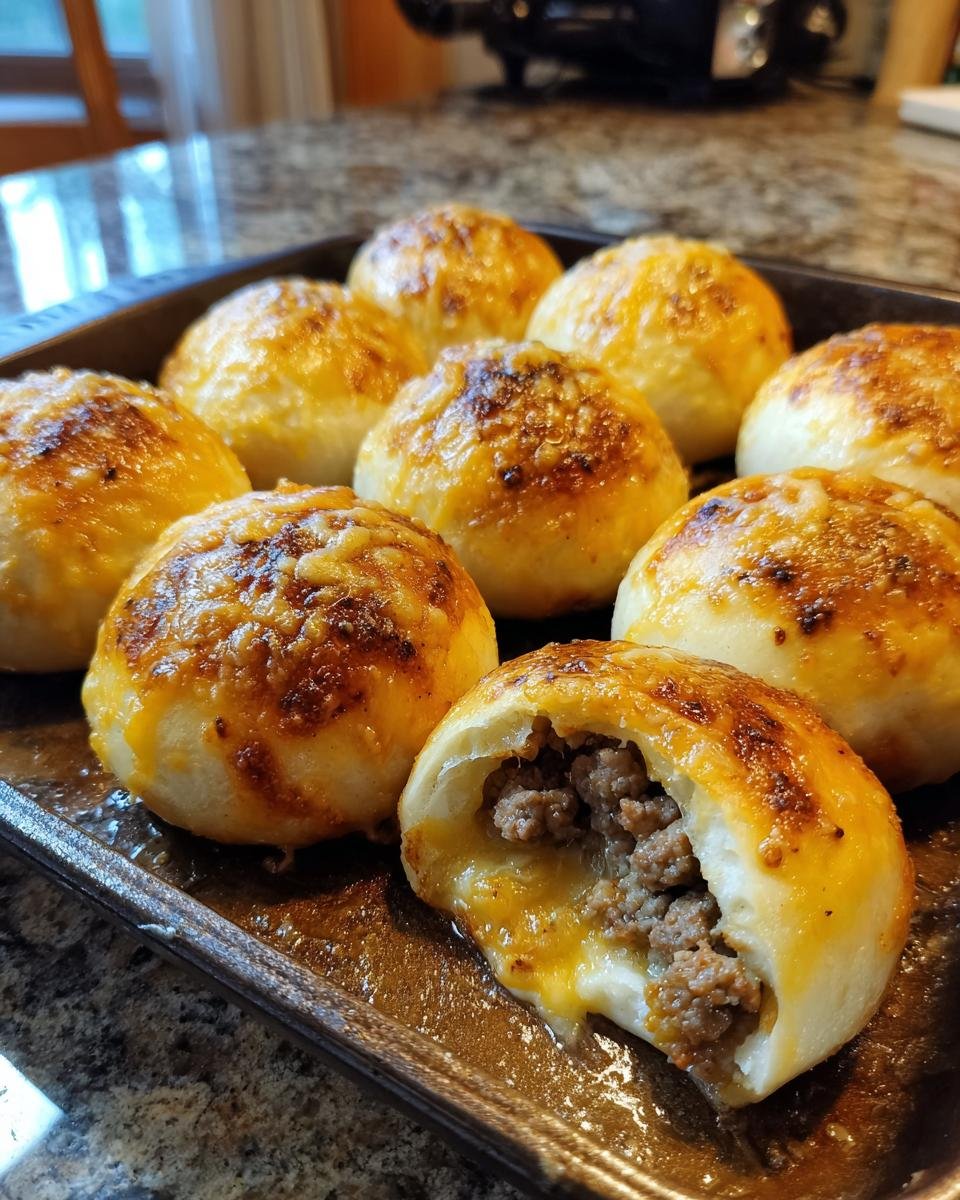
While the bombs are resting on the sheet, whisk together the melted butter, the rest of your Parmesan, and the garlic powder. Brush this buttery, garlicky glory right over the tops of all your sealed dough balls. They need that treatment! Pop them into that 375°F oven and bake them for 15 to 18 minutes. You’re looking for a deep, beautiful golden brown color, and you know the meat inside is done when that crust is perfectly crisp.
Tips for Success with Your Garlic Parmesan Cheeseburger Bombs
Even though these bombs are super simple, a couple of little tricks I’ve picked up over the years can elevate them from great to absolutely legendary. It’s all about working smart, not hard, in the kitchen! Remember, we want maximum cheese retention and perfect internal cooking temperatures. Before you get too far along, take a peek at some other fantastic ideas over at Tastiqa!
Here are the things I swear by when I make a batch:
- Chill Out the Filling: This is my number one trick, especially if your kitchen runs warm or you’re making a huge batch. After you mix up the ground beef and cheese filling, pop the bowl in the fridge for about 15 to 20 minutes. Why? Cold meat mixture is way stiffer, making it so much easier to scoop and handle when you’re wrapping it in the soft biscuit dough. It cuts down on sticky mess dramatically!
- Use the Right Biscuit Size: Make sure you’re using standard-sized refrigerated biscuits, not the smaller ‘Fluffy’ or ‘Grands’ versions if the recipe calls for standard. The bigger biscuits give you enough dough surface area to fully wrap that two tablespoons of filling without stretching the dough too thin. If you stretch it too thin, you might get those dreaded blowouts.
- Don’t Forget the Meat Thermometer: Since the outside of the dough cooks faster than the inside meat, looks can be deceiving! I always stick an instant-read thermometer into one of the fattest bombs right when the timer goes off. You want that internal temperature to hit a safe 160°F, no excuses, especially when serving these to little ones. If it’s low, give them 3 more minutes and check again.
- The Double Brush Finish: You’ll notice the recipe only calls for brushing the butter topping on once. But wow, does it make a difference if you brush it on, let it sit for five minutes while things warm up, and then give them a *second* light brush right before they go into the oven? That second layer guarantees that crunchy, intensely garlicky, golden crust we are all ultimately chasing.
Ingredient Notes and Substitutions for Garlic Parmesan Cheeseburger Bombs
Look, I get it. Sometimes you’re halfway through a recipe and realize you’re missing that one specific thing. Don’t panic! We can usually swap things out in these cheeseburger bombs without losing the magic. The main thing we can’t mess with too much is the meat-to-dough ratio, but the spices and cheese? We have some wiggle room. If you want to explore more quick swaps like this, check out the genius ideas available over at Tastiqa!
Here are a few things I’ve learned when improvising:
- Biscuit Dough Alternatives: If you don’t have the refrigerated biscuit dough (the absolute easiest option), you can totally use store-bought pizza dough or even crescent roll dough. Just be aware that pizza dough might need a slightly longer bake time because it’s typically thicker. With pizza dough, you’ll need to cut out your own squares instead of using the pre-formed biscuits.
- Cheese Swaps for Meltability: Mozzarella is king here because it gets wonderfully stretchy, but if you’re out, Fontina or Monterey Jack cheese are fantastic substitutes. They melt beautifully and offer a great creaminess. Just try not to use hard, aged cheeses inside the filling, as they won’t melt into that comforting lava flow we are aiming for!
- Upping the Bacon Game: The original suggestion mentioned adding bacon, and I am telling you, DO IT. If you have some pre-cooked bacon bits hanging around, toss about a quarter cup right in with your beef mixture. It adds that salty, smoky depth that just screams ‘classic burger.’ It pairs perfectly with the garlic and that salty Parmesan crumb on top.
- Dealing with Garlic: If you don’t have fresh minced garlic for the filling, you can get away with 1/2 teaspoon of garlic paste or even garlic powder *in the filling*, but you still need that fresh garlic kick for the topping. Fresh garlic just has more punch than powder when it’s brushed on top like that finishing coat.
Serving Suggestions for Garlic Parmesan Cheeseburger Bombs
Okay, these Garlic Parmesan Cheeseburger Bombs are rich, savory, and intensely flavorful all on their own. When they pop out of the oven—golden, buttery, and smelling like the best part of a backyard barbecue—they are perfect just as they are. That said, if you’re serving them as part of a bigger meal or just want to dip them in something spectacular, I have a few ideas that cut through the richness perfectly! Remember my one major rule here: these are best served immediately; the biscuit dough stays tender and the cheese is liquid gold right out of the oven.
If you’re looking for more amazing companion pieces for your meals, I always find inspiration on Tastiqa!
Here’s how I like to balance things out when these bombs hit the table:
- Tangy Dipping Sauces are a Must: Because the bombs are so rich with beef and Parmesan, you need something bright to cut through it all. My go-to is always a simple comeback sauce—it’s mayo, ketchup, a splash of Worcestershire, hot sauce, and a little vinegar. You could also just offer plain ketchup or a really good spicy mustard any day of the week!
- Something Fresh and Cool: If you’re serving these for dinner instead of just an appetizer, you need a vegetable component that feels light. I love pairing them with a simple, crisp green salad tossed in a bright lemon vinaigrette. That acidic dressing is the perfect counterpoint to all that cheesy, garlicky goodness. Forget heavy sides!
- Pickles, Pickles, Pickles: You can’t have a cheeseburger without pickles, right? Even if you didn’t put them inside the bomb, serve a big bowl of dill pickle spears on the side. The vinegary crunch snaps through the richness of the ground beef and fat in the dough beautifully. You can even chop them up and mix them into your dipping sauce!
- Creamy Ranch Backup: Sometimes, you just want classic, cool, creamy goodness. A nice, homemade buttermilk ranch dressing is always a winner for dipping these babies. It’s familiar and satisfying, especially if you’re serving them to pickier eaters.
Storage and Reheating Instructions for Leftover Garlic Parmesan Cheeseburger Bombs
Oh, an excellent problem to have—leftovers! While these bombs truly shine when they are piping hot straight from the oven, they are just as tasty the next day if you handle the storage correctly. The biggest thing to remember here is that we want to preserve that slightly crisp exterior we worked so hard to achieve with the butter and Parmesan topping. If you are looking for tips on storing many different things, I always check out the helpful advice available at Tastiqa!
Here’s exactly how I keep mine tasting almost as good as fresh:
- Storing Them Right: You absolutely must let the bombs cool completely before you try to pack them away. If you put warm food into an airtight container, you’re just inviting steam, and steam equals soggy crust. Once fully cool, place them in a single layer in an airtight container. You can pop parchment paper between layers if you have too many to fit, but honestly, they go so fast, I’ve never needed more than one layer! They usually stay great in the fridge for about 3 to 4 days.
- The Microwave is Not Your Friend: I need you to trust me on this one—if you microwave these, they will turn into sad, doughy little sponges. That crispy topping will go completely soft, and nobody wants that experience! We need the heat to be dry and direct to bring back that lovely golden crust.
- Reheating in the Oven (Best Method): Preheat your oven to a moderate 350°F. Place your leftover bombs directly onto a baking sheet lined with foil or parchment paper. Bake them for about 8 to 10 minutes. Keep an eye on them, because we are just warming them through and re-crisping the outside, not cooking them again. They’ll come out perfectly warm and slightly crunchy!
- The Air Fryer Shortcut: If you have an air fryer, this is hands-down the fastest way to get crispy results! Set your air fryer to 325°F and cook the cooled bombs for just 4 to 6 minutes. Give that basket a gentle shake halfway through. They are ready when the top is just starting to sizzle again. It’s almost instant gratification!
Frequently Asked Questions About Cheeseburger Bombs
I knew you’d have questions! Honestly, the more you make these Garlic Parmesan Cheeseburger Bombs, the more little tweaks you discover. It’s that kind of recipe—it begs you to play with it! These little bundles of beef and cheese wrapped in biscuit dough are super popular, and I get asked the same things constantly. Before you dive in, maybe you want to check out some other tried-and-true helpers over at Tastiqa for other shortcuts!
Can I make the meat mixture for the Garlic Parmesan Cheeseburger Bombs ahead of time?
Oh, absolutely you can, and I highly recommend it if you’re planning a party! You can mix up the entire beef filling—beef, spices, breadcrumbs, milk, egg, garlic, and both cheeses—up to 24 hours in advance. Mix it really well, cover it tight, and keep it chilled in the fridge. That chilling time actually helps the flavors deepen a little bit, which is a bonus! The one thing you shouldn’t do ahead of time is wrap the filling in the dough. The moisture from the meat will start to make the dough gummy, and you’ll have trouble sealing them later. So, mix the filling early, but assemble the bombs right before you bake them.
What is the best way to prevent the cheese from leaking out of the biscuit dough?
This is the number one worry people have! We are talking about melted mozzarella mixed with ground beef here, so leakage is always a risk. You need two things working in your favor: technique and temperature control. First, make sure you are pinching the seams of the biscuit dough together really firmly. Roll the sealed ball lightly between your palms once or twice to smooth out any weak spots. Second, and this is crucial, make sure your meat mixture is cold before you start wrapping! If the filling is ice cold, the cheese inside stays a bit firmer longer, giving that dough time to bake and seal around it before the cheese gets too runny. If you notice a hole starting to form when you wrap something, patch it quickly with a tiny scrap of dough from another flattened biscuit!
If you are looking for more ways to make sure your baking turns out flawless, I always share my best tips over at Tastiqa!
Estimated Nutritional Information for Garlic Parmesan Cheeseburger Bombs
Now, let’s talk numbers, even though I always say that the true nutrition here comes from the joy these little bites bring! Since these Garlic Parmesan Cheeseburger Bombs are made with ground beef, biscuit dough, and cheese, they are definitely a hearty snack or dinner. I’ve laid out the breakdown below based on the standard recipe guidelines. If you’re into checking out more health-conscious recipes or learning about food guidelines, I always point people toward Tastiqa’s resources.
Please remember, this is just an estimate! If you use leaner ground beef or a low-fat biscuit dough, your numbers will shift. This data assumes the recipe makes 8 equal-sized servings.
- Serving Size: 1 bomb
- Calories: 350
- Total Fat: 20 grams (and that includes about 9 grams of saturated fat—worth it!)
- Cholesterol: About 60mg
- Sodium: 650mg—yes, they are savory!
- Total Carbohydrates: 22 grams
- Dietary Fiber: 1 gram
- Sugars: Only about 3 grams (mostly from the milk and dough)
- Protein: A solid 18 grams per bomb—they are filling!
See? Not too shabby for a cheeseburger wrapped in a buttery biscuit! Just a friendly reminder: these estimates are based on the ingredients listed and the yield of 8 balls. If you sneak a couple extra bites straight from the pan while they’re cooling (I do that!), your count will obviously go up. Enjoy responsibly!
Print
Garlic Parmesan Cheeseburger Bombs
- Total Time: 33 min
- Yield: 8 servings 1x
- Diet: Low Fat
Description
Bite-sized cheeseburger filling wrapped in dough, seasoned with garlic and Parmesan cheese, then baked.
Ingredients
- 1 pound ground beef
- 1/2 cup breadcrumbs
- 1/4 cup milk
- 1 egg
- 1 teaspoon salt
- 1/2 teaspoon black pepper
- 1 cup shredded mozzarella cheese
- 1/2 cup grated Parmesan cheese
- 2 cloves garlic, minced
- 1 package (8 count) refrigerated biscuit dough
- 2 tablespoons melted butter
- 1 teaspoon garlic powder
Instructions
- Preheat your oven to 375 degrees F. Line a baking sheet with parchment paper.
- In a bowl, combine the ground beef, breadcrumbs, milk, egg, salt, and pepper. Mix until just combined.
- Stir in the mozzarella cheese, 1/4 cup of the Parmesan cheese, and minced garlic into the beef mixture.
- Flatten each biscuit piece slightly. Place about 2 tablespoons of the meat mixture in the center of each biscuit.
- Wrap the dough around the meat mixture and pinch the edges together to seal completely, forming a ball. Place the sealed balls seam-side down on the prepared baking sheet.
- In a small bowl, mix the melted butter, remaining 1/4 cup Parmesan cheese, and garlic powder. Brush this mixture over the tops of the dough balls.
- Bake for 15 to 18 minutes, or until the biscuits are golden brown and the meat is cooked through.
Notes
- Serve immediately with your favorite dipping sauce.
- You can use pre-cooked bacon bits in the meat mixture for extra flavor.
- Prep Time: 15 min
- Cook Time: 18 min
- Category: Dinner
- Method: Baking
- Cuisine: American
Nutrition
- Serving Size: 1 bomb
- Calories: 350
- Sugar: 3
- Sodium: 650
- Fat: 20
- Saturated Fat: 9
- Unsaturated Fat: 11
- Trans Fat: 0.5
- Carbohydrates: 22
- Fiber: 1
- Protein: 18
- Cholesterol: 60
Keywords: cheeseburger bombs, garlic parmesan, ground beef, biscuit dough, appetizer, baked snack